When you try to print a document or image using your printer, it may print the contents in an inverted color scheme (black background with white text). The result is the same when you print a test page via the printer properties, or print from Word, Open Office, Libre Office, or any other program. This issue causes the ink to drain out very quickly.
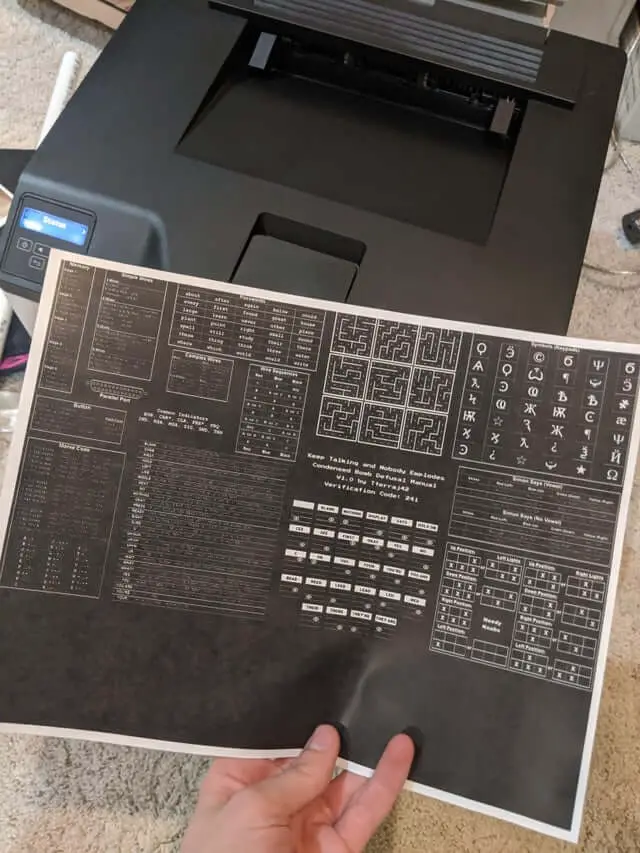
However, when you print to the same printer from another computer or tablet device, the output may come up correctly.
This issue is caused due to incorrect or generic drivers installed for the printer. As per my observation, this problem is mostly seen on some Brother laser printer models on Windows 10. This issue could have surfaced after installing a feature update for Windows 10.
[Fix] Printer Prints Documents in Inverted color
There are at least three methods to resolve the inverted colors issue when printing. Follow one of these methods. If a method doesn’t help, proceed to the next method.
Method 1: Change the Driver via Printer Properties
Some users of the Brother printer have indicated that changing the driver via printer properties fixed the problem.
- Open Control Panel → Devices and Printers page
- Open the printer properties dialog by right-clicking on the printer.
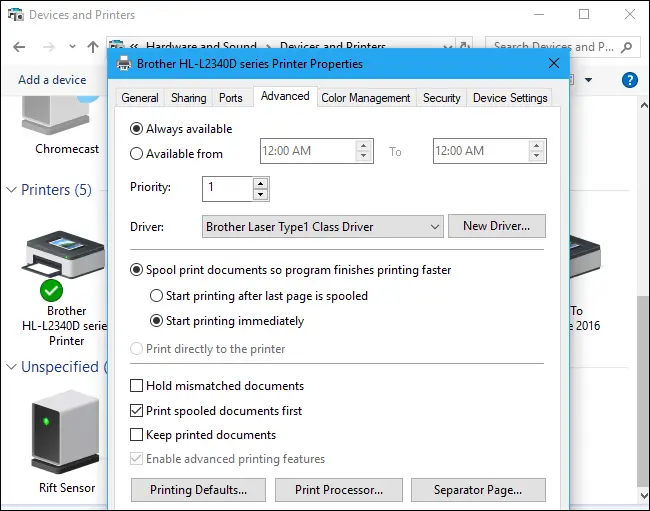
- Click on the Advanced tab.
- Click on the New Driver… button.
- Click Next
- Under manufacturer, select Brother (if you have a printer from Brother)
- In the list box on the right, select
Brother Laser Type1 Class Driver
Important:
Brother Laser Type1 Class Drivermay not always be the appropriate driver. You must select the appropriate one for your model of Brother printer. Yours could beBrother Laser Leg Type2 Class Driver,Brother Laser Type2 Class Driver, or something else.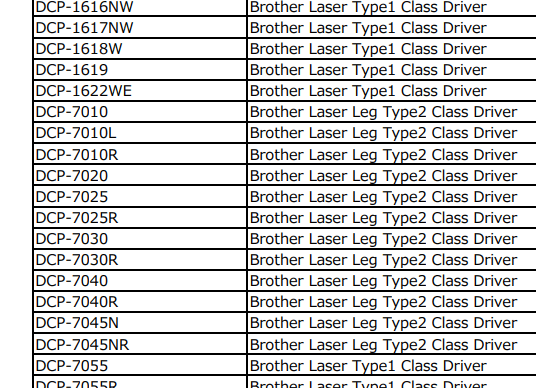
For the complete list of Brother printer driver types and the corresponding model numbers, check out the official PDF document below:
https://support.brother.com/g/s/id/pdf_pub/winrt_10s/builtin_driver_name_list.pdf
- Click Finish to complete the installation procedure.
Method 2: Uninstall the printer & Reinstall the correct drivers
- Open Control Panel → View Devices and Printers (under Hardware and Sound). If you’re in classic view, click Devices and Printers.
- Right-click on the printer and then click on Remove device.
- Click Yes, to confirm that you want to delete the printer.
- Remove the printer driver completely via Print Server Properties.
- In the Devices and Printers applet, click Add a printer. The computer will begin searching for an available network printer.
- Click “The printer that I want isn’t listed.” — this step will prevent Windows from installing the generic driver, which doesn’t offer full functionality.
- Click “My printer is a little older. Help me find it”. Windows should now locate the connected printer on the local machine or network.
- If you receive a message stating that the driver is already installed, select Replace the current driver and click Next.
- Leave the default printer name and then click Next.
- Select a printer sharing option and then click Next.
- You may set your machine as the default printer.
- Click Finish.
- Print a test page now to check if the issue is resolved.
Method 3: Download the Full & Software Package (Recommended)
If the above method doesn’t resolve the issue, visit the printer manufacturer’s site and download the complete printer software package instead of the minimal driver package. If you have a Brother printer, the driver and software package download link is given below:
https://support.brother.com/g/b/countrytop.aspx?c=us&lang=en
If the Full Software Package is not available for your model, install the Printer Driver or Scanner Driver, or both, depending on the functions supported by your model.
Note: Before installing the full driver or software package, remove the existing printer drivers first using Steps 1-4 under “Method 2” of this article.
Method 4: Check your printer settings – Print text in black
- In the Brother printer properties dialog, click Advanced, and click Printing Defaults…
- In the Printing preferences dialog, click Advanced, and click Other Print Options(K)…
- In the Other Print Options dialog, select “Print Text in Black”
- Enable the “Print Text in Black” checkbox.
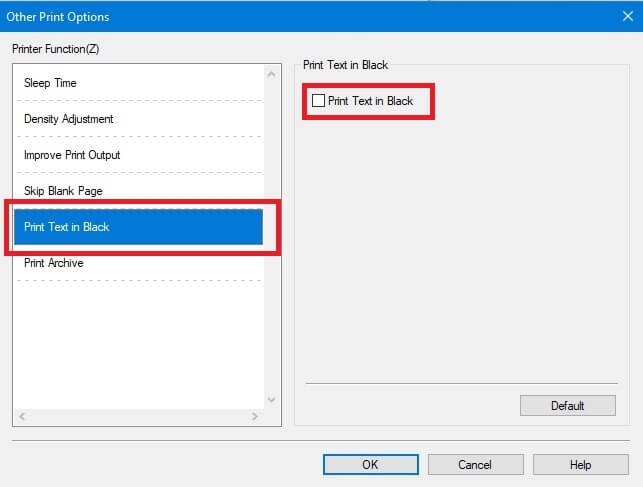
- Click OK, OK, to save your settings.
Method 5: Update the firmware of your Brother printer
Installing the latest firmware update for your Brother printer model can resolve the inverted/negative printing issues with your printer. Some Redditors have indicated that the latest firmware update has indeed resolved the issue on their systems.
Redittor Jim Dantin said:
This has come up a few times lately. The fix is to update the printer’s firmware. Check with Brother support if you don’t know how to do it.
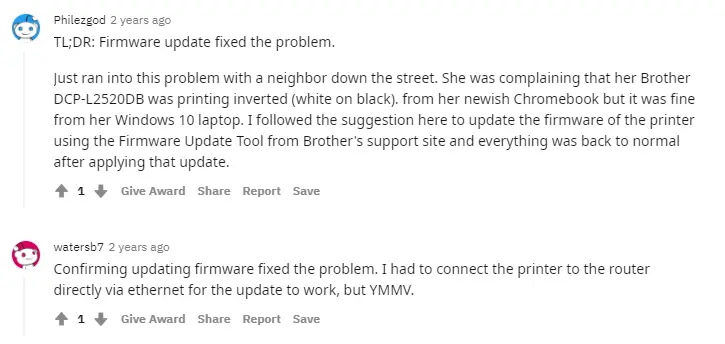
Redditor Philezgod said:
TL;DR: Firmware update fixed the problem.
Just ran into this problem with a neighbor down the street. She was complaining that her Brother DCP-L2520DB was printing inverted (white on black). from her newish Chromebook but it was fine from her Windows 10 laptop. I followed the suggestion here to update the firmware of the printer using the Firmware Update Tool from Brother’s support site and everything was back to normal after applying that update.
Redditor watersb7 said:
Confirming updating firmware fixed the problem. I had to connect the printer to the router directly via ethernet for the update to work, but YMMV.
Here’s how to Update the Firmware using the Firmware Update tool (for Brother printers):
https://help.brother-usa.com/app/answers/detail/a_id/61956/~/update-the-firmware-using-the-firmware-update-tool
See if the inverted colors printing issue is resolved now.
One small request: If you liked this post, please share this?
One "tiny" share from you would seriously help a lot with the growth of this blog. Some great suggestions:- Pin it!
- Share it to your favorite blog + Facebook, Reddit
- Tweet it!