Notepad++ is one of the excellent open-source text editors available. Many users replace the plain old Notepad with Notepad++, as the latter has a lot of features and is also lightweight. You may be knowing that the functionality of Notepad++ can be extended by installing third-party plugins into it using the built-in Plugins Admin feature.
On some computers, you may be unable to install any plugins using the Plugins Admin feature. When trying to install a plugin, it restarts Notepad but does not install the chosen plugin even though you’ve tried both x86 and 64-bit versions. On some versions you may see the following error:
Installation Error: Installation of plugin failed
This issue may persist even if the
We’ll see how to resolve the Notepad++ plugins installation issue.
When you attempt to install a Notepad++ plugin via Plugins Admin dialog, the following happens:
- The user sees the “Notepad++ is about to exit” prompt.
- Notepad++ starts the command-line updater
gup.exeelevated (run as admin) after getting the UAC consent from the user. - The current instance of Notepad++ is closed.
- The command-line updater module (
gup.exe) downloads the chosen extension from the source website in the background, and the extension file (.dll) is copied to the Plugins folder. - Notepad++ process is launched again.
When the user clicks on the Plugins menu or opens the Plugins Admin page, the chosen plugin should show up in the Installed list.
[Fix] Cannot Install Notepad++ Plugins
First, make sure if you’re using the latest version of Notepad++. If you’re running an outdated version, install the latest version from https://notepad-plus-plus.org/
If that doesn’t resolve the issue, one of the following fixes should help you install Notepad++ plugins successfully.
1) Configure your Proxy server or Firewall accordingly
The Notepad++ plugin installation may silently fail if the firewall or proxy server is not allowing the outbound connection by WinGup (gup.exe).
WinGup for Notepad++ is a Generic Updater whose purpose is to provide a ready-to-use and configurable updater that downloads an update package then installs it. WinGup is capable of dealing with http protocol and process XML data. For more information, check out the project’s GitHub page.
Make sure that your proxy/firewall allows outbound access for gup.exe. The module is located under the Notepad++\Updater directory. Unless you’re using the portable copy of Notepad++, and the typical paths (for installed versions) are below:
C:\Program Files\Notepad++\updater\GUP.exe

C:\Program Files (x86)\Notepad++\updater\GUP.exe
When Windows Firewall blocks this file, and logging is enabled using security policy, the dropped connection entry appears like this in pfirewall.log:
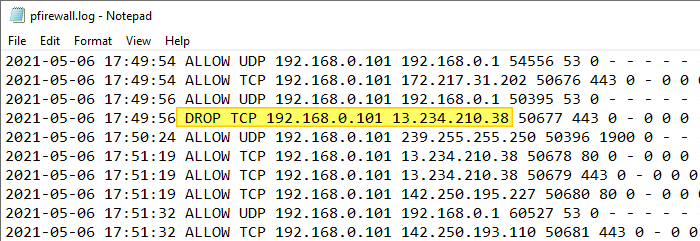
(The Remote IP, in this case, is 13.234.210.38 which resolves to github.com where most Notepad++ plugins are hosted.)
So, if you’re the administrator of your computer or network, make sure to allow WinGup to access the internet.
Proxy server
If your network uses a proxy server, make sure you enter the details via the ? menu option in Notepad. Click on the ? menu and select Set Updater Proxy…
You’ll need to do this when Notepad++ is elevated (run as administrator). Or else, it shows the message “Please relaunch Notepad++ in Admin mode to configure proxy.”
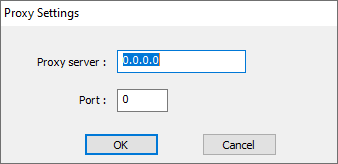
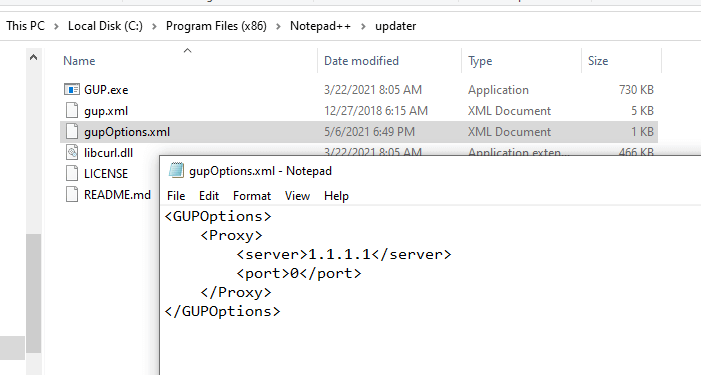
The entry is updated into the file named gupOptions.xml under Notepad++\updater directory. Alternately, using Notepad (run as administrator), you may edit the file manually and type in the proxy server configuration directly.
Assuming that your proxy or firewall is reconfigured correctly, restart Notepad++ and try installing the plugin(s) now. Unlike earlier versions, it should work even without TLS 1.0 & TLS 1.1 options enabled in Internet Explorer Options.
Proxy error?
Note that if your company’s proxy requires Windows authentication, Notepad++ doesn’t support it. If it throws the error code Received HTTP code 407 from proxy after CONNECT, it means that the proxy requires authentication. Unfortunately, Notepad++ (the latest version is 7.9.5 as of this writing) doesn’t support proxy authentication.
![]() Alternatively, you may disconnect from your company network, connect to the internet via mobile WiFi or USB tethering. Then, try to install the plugin.
Alternatively, you may disconnect from your company network, connect to the internet via mobile WiFi or USB tethering. Then, try to install the plugin.
2) Install Notepad++ Plugins manually
If reconfiguring the proxy or firewall still doesn’t let you install plugins via the Plugins Admin option, you may install them manually. Before 2015, Notepad++ plugins were hosted at sourceforge.net. After that, GitHub is now the central platform for development and bug reporting. Still, some plugins are hosted at sourceforge.net.
- Visit the following official Notepad++ GitHub page, which lists all the plugins. You can get the direct download links (for both x86 and x64) for every Notepad++ plugin available.
GitHub - notepad-plus-plus/nppPluginList: The official collection of Notepad++ plugins:
https://github.com/notepad-plus-plus/nppPluginList
Let’s say you want to install the Compare plugin. The direct download URL for the current version is below:
https://github.com/pnedev/compare-plugin/releases/download/v2.0.1/ComparePlugin_v2.0.1_x86.zip  [32-bit]

(or)

https://github.com/pnedev/compare-plugin/releases/download/v2.0.1/ComparePlugin_v2.0.1_X64.zip  [64-bit]
- Download the above zip file and extract the contents to a folder.
- Visit the plugin homepage. For the Compare plugin, the homepage is
https://github.com/jsleroy/compare-plugin
Note: You can also find the homepage of the plugin via Plugins Admin.
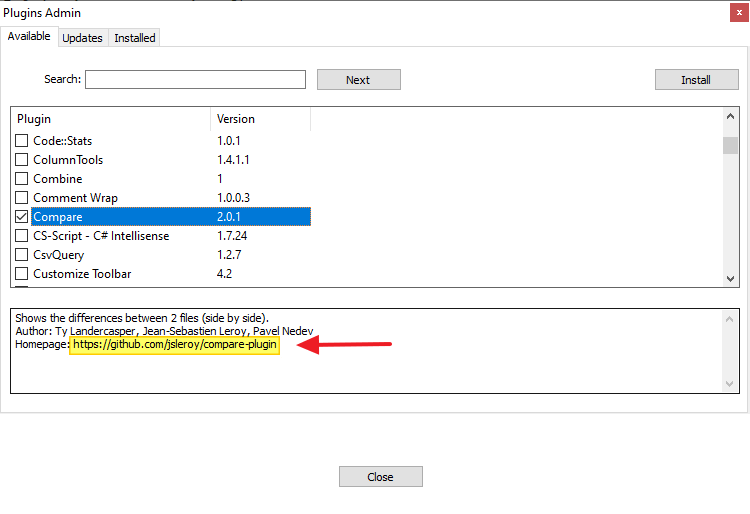
- From that page, note down the installation instructions for this plugin and follow the steps exactly as given. The official instructions say:
"To install the plugin manually for usage with Notepad++, copy ComparePlugin.dll and ComparePlugin subfolder into the plugins directory (Notepad++ installation dir)\Notepad++\Plugins. The ComparePlugin subfolder contains the libs libgit2.dll and sqlite.dll for the Diff against Git and SVN (please use the correct library versions - x86 or x64)."
Hold on! There is a small change on the plugins path in the recent versions of Notepad++. Read below.
Caveat!
-
- Each plugin needs to be added to its own folder. Placing the plugin (.dll) file under the
Notepad++\pluginsparent directory won’t work. - The folder name should be the same as the DLL name (without extension). For instance, the module name is
ComparePlugin.dll, the folder name should beComparePlugin. The following is the folder hierarchy:C:\PROGRAM FILES (X86)\NOTEPAD++ +---plugins | +---ComparePlugin | | | ComparePlugin.dll | | | | | \---ComparePlugin | | git2.dll | | sqlite3.dll
- Each plugin needs to be added to its own folder. Placing the plugin (.dll) file under the

The files
sqlite3.dllandgit2.dllgo into thePlugins\ComparePlugin\ComparePluginsubfolder, instead ofPlugins\ComparePlugin. It’s an important step! -
- Close Notepad++ and relaunch it.
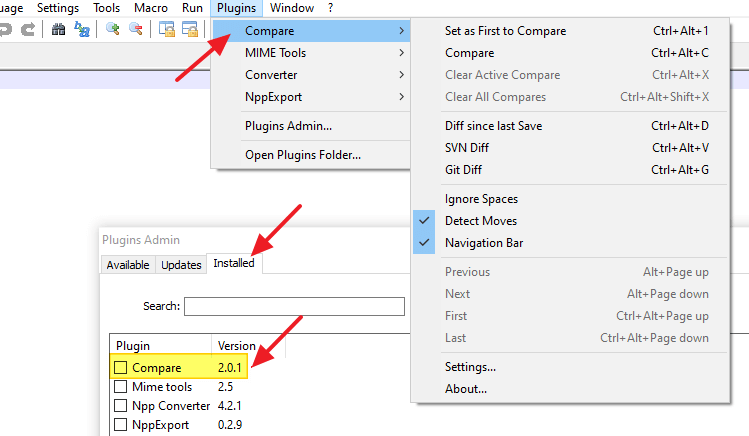
If you’ve followed the instructions correctly, the plugin (“Compare”) should be listed under the Plugins menu and the Plugins Admin dialog.
Were you able to install the Notepad++ plugin(s) now? Let’s know your comments.
One small request: If you liked this post, please share this?
One "tiny" share from you would seriously help a lot with the growth of this blog. Some great suggestions:- Pin it!
- Share it to your favorite blog + Facebook, Reddit
- Tweet it!
Worked for me, and I looked everywhere for a solution and only this page helped me. Thanks!
2) Install Notepad++ Plugins manually, step 4 is really usefull for me. I fixed it. Thanks a lot!