The System Volume Information folder is a hidden and protected folder located at the root of every drive or partition. It’s even found on your SD card, USB pen drive, and external hard disk if you have connected them to your Windows computer earlier. It’s is not a virus or malware.
But, what exactly is the System Volume Information folder? Why is the folder so huge? Can you delete the folder?
This System Volume Information FAQ page has answers to all your questions.
Contents
- What is the System Volume Information folder?
- Why is the folder not accessible?
- How to gain access to the System Volume Information folder?
- What does the folder contain?
- Why is the folder not visible in Explorer?
- Can I delete the System Volume Information folder?
- Why is System Volume Information too large?
- Prevent System Volume Information Creation on USB pen drives
What is the System Volume Information folder?
System Volume Information (SVI) is the datastore folder used by the System Restore feature. However, it’s not only used by the System Restore feature. It’s also used by Windows Information Protection (WIP), formerly known as enterprise data protection (EDP), to store the encryption keys. In addition, SVI stores metadata and information used by Windows Backup, System Image Backup, Volume Shadow Copy service, and Windows Search indexing.
Why is System Volume Information not accessible?
The System Volume Information folder is restricted using NTFS permissions. By default, only the NT AUTHORITY\SYSTEM account (“LocalSystem”) has access (Full control) to the folder and its subfolders.
Even if you’re logged in as an administrator, you’ll see the following error message when accessing the folder:
Location is not available

System Volume Information is not accessible.

Access is denied.
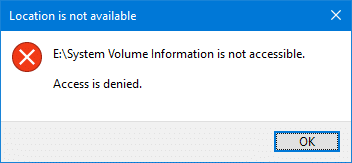
If you need to get into the folder to check its contents, see the next paragraph.
How to gain access to System Volume Information
Only the SYSTEM account has full access to the SVI folder by default. No other user or group can view the contents of this directory.
However, you can gain access to the System Volume Information folder using two methods:
Option 1: Run Command Prompt under the SYSTEM account
Using Microsoft’s PsExec.exe utility or other third-party tools, you can start a Command Prompt session under the SYSTEM account. It lets you view, modify or delete the contents of System Volume Information.
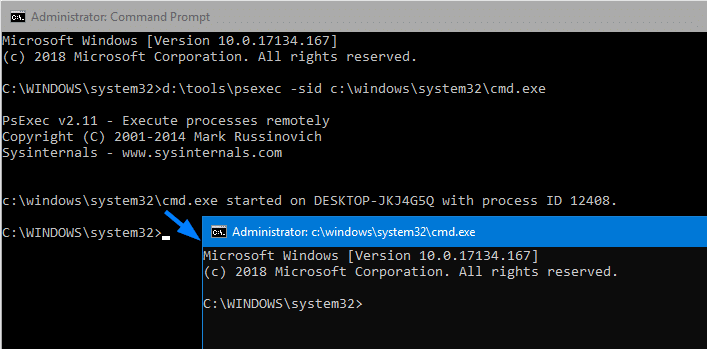
For more information, see the article How to Run a Program as SYSTEM (LocalSystem) Account in Windows
This option is preferred as there is no need to modify the folder permissions or access control entries (ACE or ACL) and later revert to the default.
Note that you can’t run File Explorer under the LocalSystem account. If you want to manage the SVI folder using GUI, you may use a third-party tool like File Commander or Total Commander (run as SYSTEM)
Option 2: Take ownership & assign full access to your account
(This is not the preferred method. There are hundreds or thousands of files in the SVI folder, and you don’t want to mess up their permissions. But, if you need to do that, follow the steps below:)
You can modify the access control entry to assign your user account full control permissions for System Volume Information and its subfolders and files:
First, you need to change ownership of those files individually — using Takeown.exe or via File Explorer.
From an admin Command Prompt window, run the following commands:
To gain access to the System Volume Information folder only:
takeown /f "C:\System Volume information"

icacls "C:\System Volume Information" /grant username:F
You should be able to do a directory listing of the System Volume Information folder, but not in the subfolders. If that doesn’t serve your purpose and you want to alter the permissions recursively (across subfolders), run the set of commands mentioned below:
To gain access to the System Volume Information folder & subfolders & files (recursively)
The following procedure is usually recommended only when you want to delete the System Volume Information folder on a drive completely.
takeown /f "C:\System Volume information" /r /d y

icacls "C:\System Volume Information" /grant username:F /t /c
Restore the default permissions
If you’ve not made the permission changes recursively, you can restore the original permissions easily. To do so, run these two commands:
icacls "C:\System Volume Information" /setowner "NT Authority\System"

icacls "C:\System Volume Information" /remove username
You should see the message Successfully processed n files; Failed processing 0 files
As said earlier, the above commands (to restore the default permissions) won’t help if you’ve modified the SVI folder permissions, subfolders, and files en masse.
(In all of the above examples, replace username with the actual user account name — e.g., Ramesh)
What does the System Volume Information folder contain?
Here is the typical directory structure of the System Volume Information folder on the system drive:
C:.
│   IndexerVolumeGuid
│   Syscache.hve
│   WPSettings.dat
│
├───EDP
│   └───Recovery
├───Windows Backup
│   └───Catalogs
│           GlobalCatalog.wbcat
│           GlobalCatalogCopy.wbcat
│           GlobalCatalogLock.dat
│
├───SPP
│ └───OnlineMetadataCache
│ └───SppCbsHiveStore
│ └───SppGroupCache
├───SystemRestore
│ └───AppxProgramDataStaging
│ └───AppxStaging
│ └───ComPlusStaging
│ └───FRStaging
│ └───FRStaging{8665F319-6B09-46AE-AAEE-75CF8D2D0EC8}
└───WindowsImageBackup
    ├───Catalog
    │       BackupGlobalCatalog
    │       GlobalCatalog
    │
    └───SPPMetadataCache
            {17466c2b-b1e0-4958-b962-c0c19974d1a0}
            {24499217-fe70-4f88-89e7-77fae19d93b5}
            {4149d215-92c7-447c-bcb6-0cbfbe517afd}
            {4277e4fa-9920-40c7-b307-22bcf52d492d}
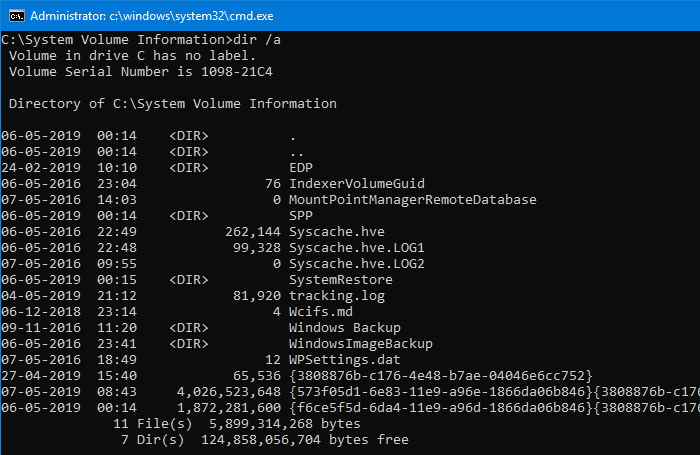
Whereas, on a USB flash drive or SD card (previously used on a Windows computer), the System Volume Information contains only these two files:
- WPSettings.dat
- IndexerVolumeGuid

The Volume Shadow Copy, System Restore, Microsoft Software Shadow Copy Provider, and the Windows Backup services store data in SPP, SystemRestore, and other folders.
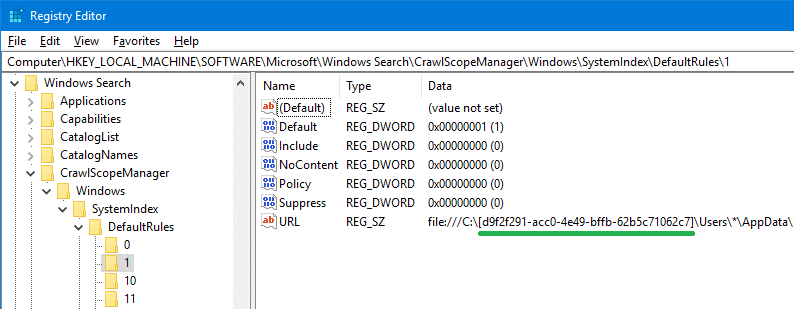
- IndexerVolumeGuid is a file used by the Windows Search service. The file contains the GUID of the current volume or partition. The search indexer, instead of just relying upon a drive-letter, uses the volume GUID for indexing. This is because the drive letters can change every now and then, especially for flash drives and external hard disks, but the volume GUIDs won’t.
 You can see hundreds of references to the volume GUID in the Windows Search-related registry keys. Here is an example:
- Tracking.log in the System Volume Information folder is used by the Distributed Link Tracking Client service (TrkWks) in Windows, which tracks links to files on NTFS-formatted partitions. It tracks links in scenarios where the link is made to a file on an NTFS volume, such as shell shortcuts and OLE links. If that file is renamed, moved to another volume, Windows uses Distributed Link Tracking to find the file.
When you access a link that has moved, Distributed Link Tracking locates the link; you are unaware that the file has moved, or that Distributed Link Tracking is used to find the moved file. Tracking.log file is created by the Distributed Link Tracking Service to store maintenance information.
Remember seeing this “Problem with Shortcut” prompt before?
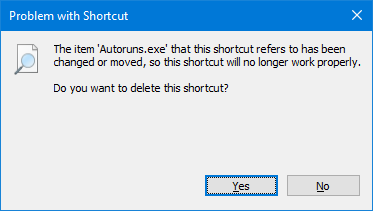
You must have seen this “missing shortcut” message If Distributed Link Tracking service is turned off and the shortcut target is moved or deleted from your system, Windows fails to track the link.
- WPSettings.dat – (No info available)
- {GUID_n} files may be used by Volume Shadow Copy service
- AppxProgramDataStaging contains a backup of your AppRepository\Packages folder under ProgramData folder.
- AppxStaging contains a backup of your WindowsApps folder.
Why is System Volume Information not visible in Explorer?
System Volume Information is hidden and protected for obvious reasons. This means it won’t show up in File Explorer unless you configure Folder Options → View tab to show hidden and protected system files.
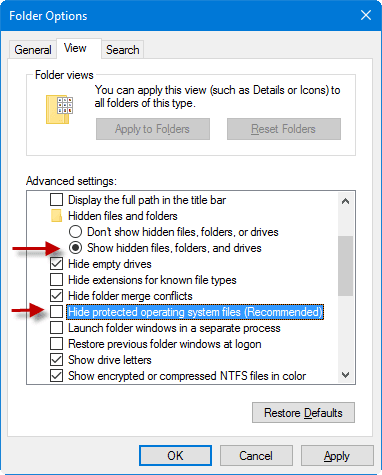
After you dismiss the dialog by pressing OK, you should see the SVI folder on each drive.
Can I delete the System Volume Information folder?
It is not advisable to delete the SVI folder. The folder, as said before, is not just the System Restore snapshots store folder. Because it contains information and metadata used by Backup, Volume Shadow Copy, and Search indexer, this folder should not be deleted, especially if it’s a system drive or the drive included in the Windows Search index.
On USB flash drives and SD cards, you may delete the folder if you don’t plan to include its locations in the Search index. However, I’d recommend leaving the folder as it is even on external drives, as it takes not much disk space. As the folder is hidden and protected (attributes: System + Hidden), it won’t be much of an annoyance.
However, if you need to delete the folder for some reason (e.g., malware infestation) and let Windows create a new folder, run these commands from the admin Command Prompt:
(Assuming C:\ drive)
cd /d c:\

takeown /f "System Volume Information" /r /d y

rd /s /q "System Volume Information"
Alternately, you can run Command Prompt under System privileges and delete the SVI folder by running the 3rd command only.
Why is System Volume Information too large?
System Volume Information can consume gigabytes of disk space if System Restore is enabled on the drive. In Windows 8 and earlier, Windows used to create a restore point daily. If the disk space allocation is incorrect or generously set by the user, then the SVI folder can occupy huge disk space–even hundreds of gigabytes.
In the following screenshot from a Windows 7 computer, you can see that the System Volume Information folder occupying 300GB of disk space on a 500GB hard disk drive.
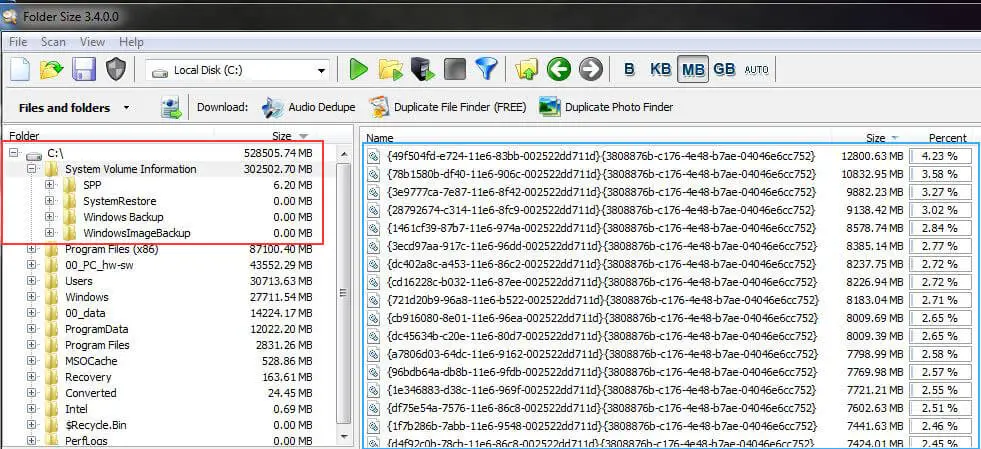
(You can easily track disk space usage using WinDirStat or TreeSize.)
Here’s a case where the SVI folder in Windows Server 2008/2012 occupying more than 300GB. This is most likely caused by scheduled system state backups using Windows Server Backup Features from Server Manager.
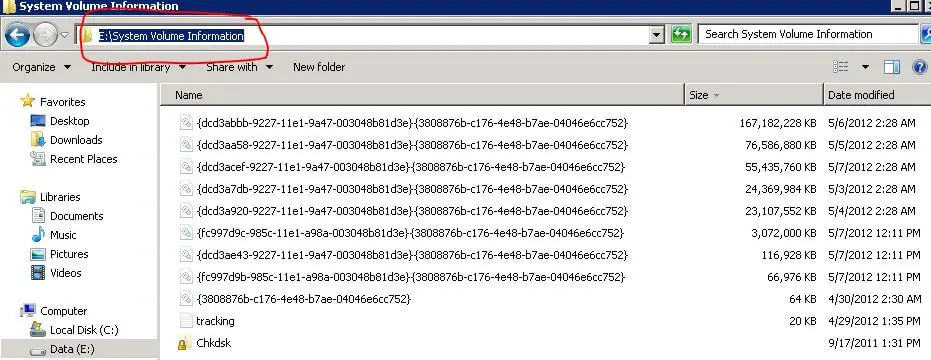
You can reduce the disk space allocation using the vssadmin.exe command-line:
From an admin Command Prompt, run “vssadmin list shadowstorage“. This will list the amount of storage used.
Shadow Copy Storage association
For volume: (C:)\\?\Volume{098cc206-0000-0000-0000-500600000000}\
Shadow Copy Storage volume: (C:)\\?\Volume{098cc206-0000-0000-0000-500600000000}\

Used Shadow Copy Storage space: 18.577 GB (92%)
Allocated Shadow Copy Storage space: 18.89 GB (94%)
Maximum Shadow Copy Storage space: UNBOUNDED (100%)
Running the command below will set a limit to the space used — e.g., 5GB.
vssadmin resize shadowstorage /For=C: /On=E: /MaxSize=5GB
Delete all Shadow copies
If the above doesn’t delete the old shadow copies, run these commands to clear the shadow copies on C and D:
You should see the message Successfully resized the shadow copy storage association.
vssadmin delete shadows /for=C: /all
vssadmin delete shadows /for=D: /all
Issue: System Volume Information folder too large on Windows Server
One of the users posted that the SVI was occupying around 165 GB of disk space and wondered how to free up space.
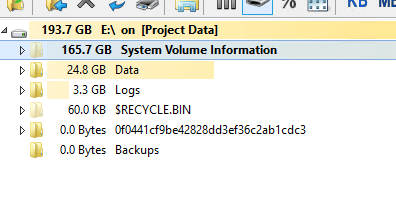
Microsoft employee Chelsea Wu posted this solution to reduce the SVI folder size on Windows Servers.
On Windows Server 2012, you can safely free up the space of the System Volume Information folder as follows:
Delete the GUIDs files in the System Volume Information folder using DiskShadow.exe.
- From an admin command prompt, run
DiskShadow.exe. - Type
Delete shadows OLDEST E:\(ReplaceE:\with the actual drive letter in which you want to free up disk space) - Type
Exitto exit DiskShadow.exe.
Change the amount of disk space available to VSS.
-
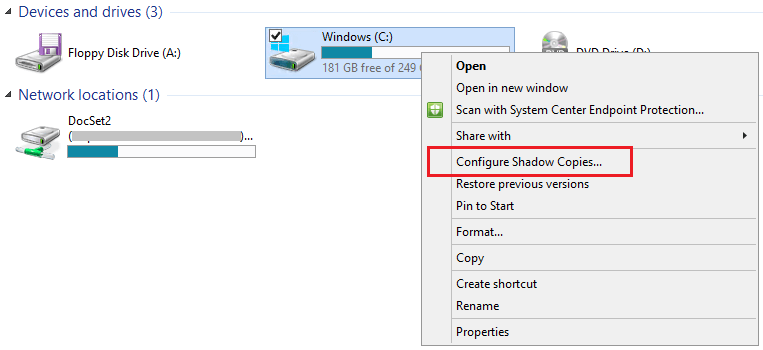
- Right-click on the drive you want to configure (in this scenario:
E:\), then click Configure Shadow Copies.
- Click “Settings” and then change the number under Maximum size → Use limit. Click OK to save.
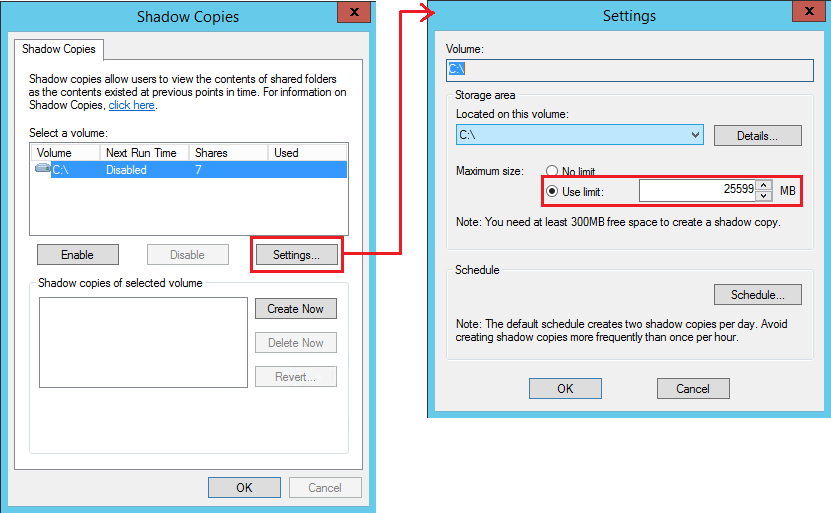
(Set the size of the Shadows Copies storage. And you can adjust the schedule to prevent the SVI folder size from growing enormously.)
- Right-click on the drive you want to configure (in this scenario:
For more information, check out the Technet forum thread Reduce the size of System Volume Information folder.
The extra shadow copies would be deleted in the System Volume Information folder once you reduce the Maximum size.
Additionally, the old system state backups created using Windows Server Backup can be deleted using the following command in Windows Server:
wbadmin delete systemstatebackup -keepversions:0
Windows 10
The above wbadmin command-line is valid for Windows Server editions only. When you run the command on Windows 10, you’ll see the following error:
Warning: The DELETE SYSTEMSTATEBACKUP command is not supported in this version of Windows.
The operation ended before completion.
On Windows 10, you can use the System Properties GUI to increase or decrease the disk space allocation for System Restore or the Volume Shadow Copy feature. And, the old restore points and shadow copies can be deleted using Disk Cleanup. Using Disk Cleanup, you can clear all but the latest Restore Point and Shadow Copy.
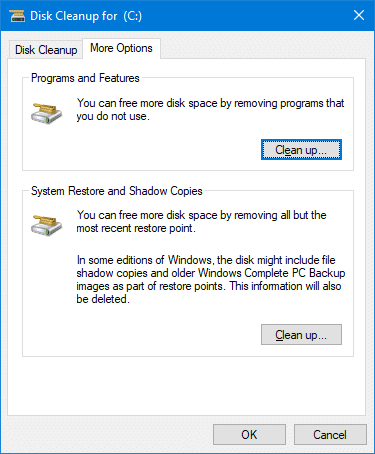
- Start Disk Cleanup as administrator and select the system partition. Click on More Options. Click Clean up…
This option removes all but the most recent restore point. It also erases shadow copies and older Backup images as part of restore points. As a result, the System Volume Information folder’s disk space usage will be remarkably reduced.
Unlike earlier versions of Windows, Windows 10 doesn’t automatically create restore points every 24 hours. It creates it only when needed so that there won’t be unnecessary restore points. But if you need, you can create one daily using a custom script with Task Scheduler.
If you’re using low capacity hard disk, you can either lower the disk space allocation for System Restore or clear all restore points to save disk space.
- Launch
sysdm.cplfrom the Run dialog - Click “System Protection”
- Select the drive for which you want to reduce the disk space allotment. Click Configure.
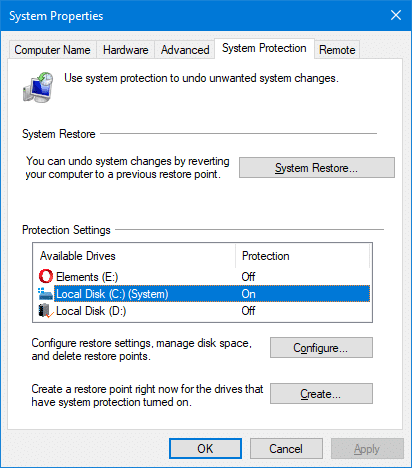
This tab shows the current disk usage by System Restore in the SVI folder. - Under Disk Space Usage, drag the Max Usage slider towards the left.
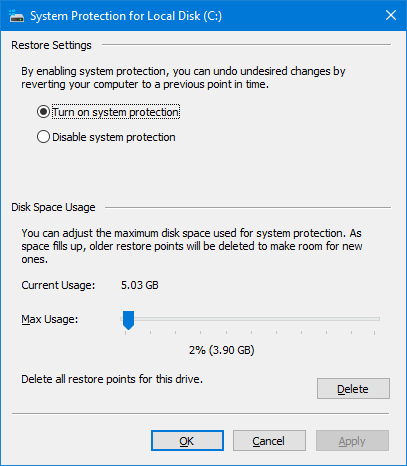 Or, to reduce the disk space slider in a granular fashion, click exactly on the pointer in the slider to select it. And use the left or right arrows on your keyboard. Each tap of the left or right arrow decreases or increases the disk usage slider by 1%.
If you reduce the slider to the left, the disk space allocation to the System Restore feature is lowered, keeping the SVI folder size low. The oldest restore points are purged automatically (FIFO) so that the System Restore doesn’t use more space than what you allocated.
You also have the option to delete all the restore points for the drive. Press the Delete button if the system has very low disk space.If your anti-virus software warns of a virus in the System Volume Information folder, you may need to disable system protection and click Apply in the above dialog. This erases all your restore points. You can turn it back again. - Click OK, OK.
If you want to delete individual restore points without clearing them all, see How to Delete Individual System Restore Points in Windows
Prevent System Volume Information Creation on USB drives
The System Volume Information folder appears on the root of every disk partition in your system. The folder is created on external hard drives, SD cards, and USB flash drives as well.

Let’s now see how to prevent the creation of the SVI folder on your USB flash drive, external drive, or SD card formatted with NTFS.
There is a widely circulating (on the internet) fix for this problem. They suggest setting the registry policy DisableRemovableDriveIndexing to 0 in the following registry key to prevent the creation of the SVI folder. If the policy is enabled, locations on removable drives cannot be added to libraries. In addition, locations on removable drives cannot be indexed.
HKEY_LOCAL_MACHINE\SOFTWARE\Policies\Microsoft\Windows\windows search
The registry value corresponds to Do not allow locations on removable drives to be added to libraries Group Policy setting.
However, setting DisableRemovableDriveIndexing to 0 in that registry key doesn’t prevent the creation of System Volume Information folder on removable drives when I tested in Windows 10.
On USB flash drives or SD cards, the Windows Search Indexer SearchIndexer.exe creates the System Volume Information (SVI) folder and two files: IndexerVolumeGuid and WPSettings.dat in that folder. The IndexerVolumeGUID file stores the unique identifier (GUID) of the current partition or volume.

WPSettings.dat may have been created by the Storage Service, which the Windows Store app uses. If the Storage Service is disabled in an attempt to disable the creation of WPSettings.dat, then downloading apps in the Windows Store cause the error 0x800706D9 – Something unexpected happened and no apps can be installed from the Store.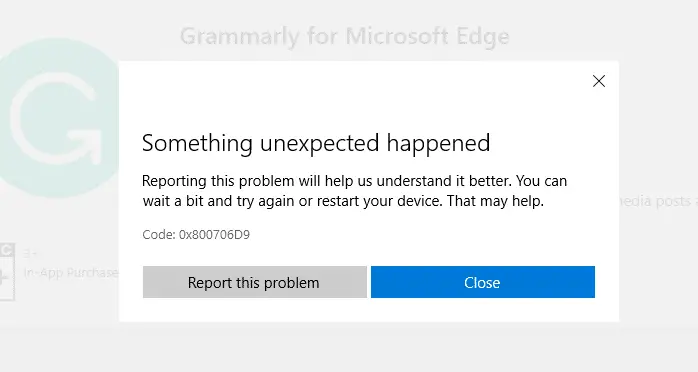
To reenable Storage Service, start Services.msc → double-click Storage Service → Set its startup type to Manual.
Step 1: Delete the System Volume Information folder on USB
On NTFS volumes, the SVI folder by default can be accessed only by the SYSTEM account, which has the Full Control permissions. You can remove the System Volume Information folder using the following commands from an admin Command Prompt.
Replace H:\ in the following example with the actual drive letter of your USB/SD card media. Make sure you don’t inadvertently remove the SVI folder in your system partition or elsewhere.
cd /d h:\

takeown /f "System Volume Information" /r /d y

rd /s /q "System Volume Information"
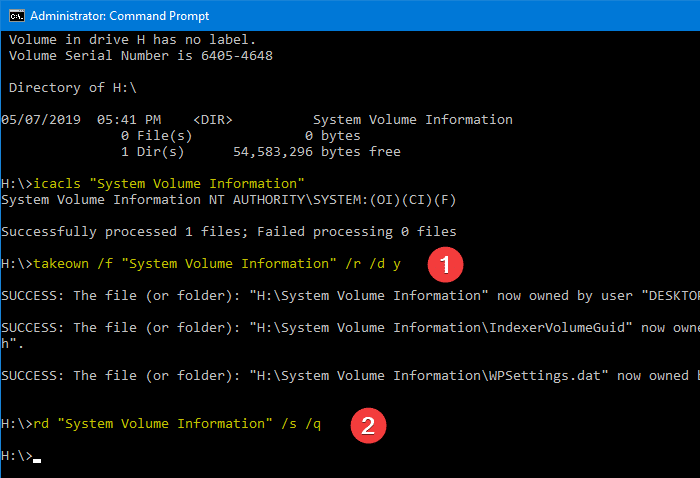
This removes the folder along with the sub-folders (if any) and files.
Step 2: Prevent the creation of System Volume Information on a USB drive
The SVI folder is created by the Windows Search indexer program, which runs under the SYSTEM account. This is the process that creates the SVI folder along with the two files in it.
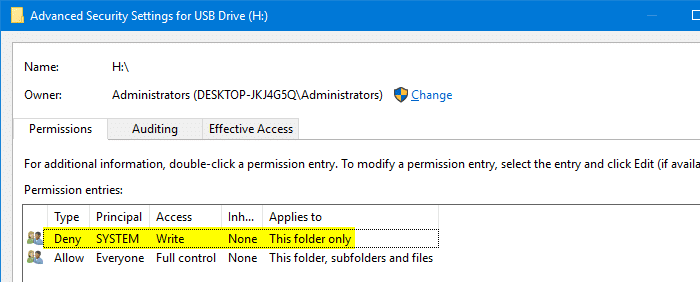
By denying Write access for the SYSTEM account to the root directory of a USB drive, you can stop the SVI folder from being created. This, of course, works only if your USB drive uses the NTFS file system.
Important: Don’t perform the following steps on a USB drive or SD media if you’re using it as a storage volume for File History, Windows Backup, System Image Backup, etc. If you deny ‘write’ access to the SYSTEM account on the drive, none of those tools will be able to work correctly.
From an admin Command Prompt, run the following command:
icacls h:\ /deny system:W

The above command denies “Write” access to the SYSTEM account on the root of H:\ (USB media drive-letter).
If you want to do this via the Security tab → Advanced Security Settings, configure it as shown in the image below:
How to reverse or undo the Permission entry?
To undo or reverse the above permission setting, run this command:
icacls h:\ /remove:d system
With the “Deny” permission entry removed, the SYSTEM account will now be able to write to the root of the drive. Search indexer will create the System Volume Information folder on the drive.
I hope this article provided detailed information about the System Volume Information folder in Windows.
One small request: If you liked this post, please share this?
One "tiny" share from you would seriously help a lot with the growth of this blog. Some great suggestions:- Pin it!
- Share it to your favorite blog + Facebook, Reddit
- Tweet it!
What a waste of time!
99% of people just need to know how to delete the f***ing SVI from accidental creation on a USB drive. e.g. Drive plugged in on laptop startup!
But, thank you for providing me a very easy way to achieve this.
For any one having difficulty:
Goto root of USB Dive and, from elevated command prompt. Type “dir” to display directory, “takeown” to take ownership from SystemUser, and “rd” to remove the directory and all its internal files.
dir /A:Htakeown /f "System Volume Information" /r /d y
rd /s /q "System Volume Information"
dir /A:H