When you try to run files downloaded from the internet, the following error may appear on your Windows 10 computer:
In some systems, the same error may pop up also when opening Command Prompt or PowerShell.
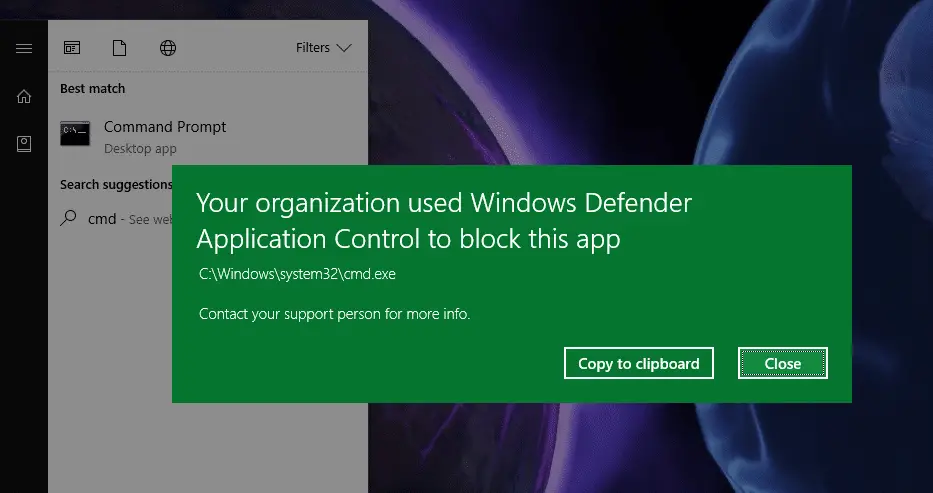
This error has nothing to do with the latest Feature Update for Windows 10, the Fall Creators Update.
Your organization used Windows Defender Application Control to block this app
To fix the error Your organization used Windows Defender Application Control to block this app:
- Switch out of Windows 10 S mode to the regular Windows 10 Home or Pro version.
- Disable Secure Boot in BIOS
Switch out of Windows 10 S mode
The Windows Defender error may be occur if you’ve installed Windows 10 S mode. It appears that some users have chosen the wrong installation routine and ended up with Windows 10 S instead of the standard version of Windows 10 Pro or Home.
You can check if you’re running in Windows 10 S mode via Activation settings page.
- Click Start → Settings → Update & Security → Activation
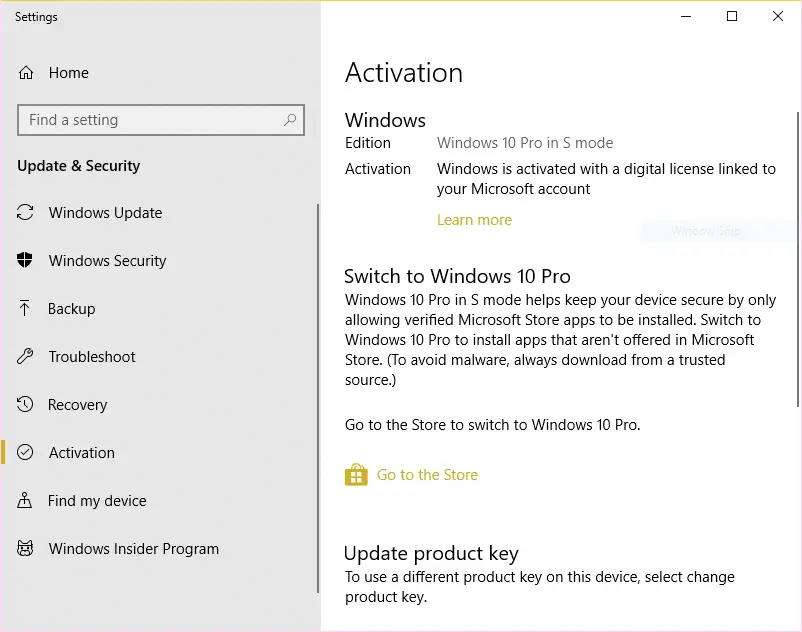
Windows 10 in S mode is a version of Windows 10 that’s streamlined for security and performance, while providing a familiar Windows experience. To increase security, it allows only apps from the Microsoft Store, and requires Microsoft Edge for safe browsing.
To fix the problem, you’ll need to permanently switch out of S mode. There’s no charge to switch out of S mode, but you won’t be able to turn it back on.
- On your computer running Windows 10 in S mode, open Settings → Update & Security → Activation.
- Click on the Go to the Store link, listed under the Switch to Windows 10 Home or Switch to Windows 10 Pro section.
Note: Don’t select the link under Upgrade your edition of Windows. That’s a different process that will keep you in S mode.
- On the page that appears in the Microsoft Store (Switch out of S mode or a similar page), select the Get button.
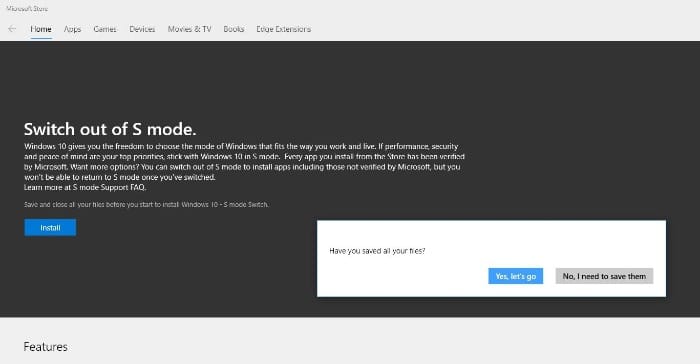
After you confirm this action, you’ll be able to install apps from outside the Microsoft Store or run apps without being blocked by Windows Defender Security.
Try changing the Product Key to switch to Pro or Home. Use the generic Pro Product Key (found in \Sources\Product.ini on Windows 10 install media):
VK7JG-NPHTM-C97JM-9MPGT-3V66T [for Pro]
An easy way to switch Product Key is to run from Admin Command Prompt, for Windows 10 Pro:
slmgr.vbs /ipk VK7JG-NPHTM-C97JM-9MPGT-3V66T
If you are unable to open elevated an Command Prompt:
- Launch launch Task Manager, click More details view, then try running a new task (cmd.exe) with Admin privileges from the File menu.
If the slmgr.vbs method does not work, use the Change Product Key in the Activation screen in Settings.
Should the change of edition or activation method fail to work, then you need to obtain the Windows 10 ISO for Home/Pro from Microsoft. Then do a clean install of Windows.
Windows 10 Home and Pro – Disable Secure Boot in UEFI/BIOS Setup
If you’re sure you’re not using Windows 10 S Mode, yet the problem occurs in regular versions of Windows 10 Home or Pro, then you may try disabling Secure boot. Disabling Secure Boot in the BIOS helped many users.
Secure Boot is a feature of many newer EFI or UEFI machines which helps a computer resist attacks and infection from malware, and prevents it from booting into anything but Windows 8/10. When your computer was manufactured, UEFI created a list of keys that identify trusted hardware, firmware, and operating system loader code. It also created a list of keys to identify known malware. When Secure Boot is enabled, the computer blocks potential threats before they can attack or infect the computer.
To disable secure boot, use these steps:
- Turn off the computer.
- Turn on the computer, then immediately press ESC repeatedly, about once every second, until the Startup Menu opens.
- Press F10 to open BIOS Setup for HP and Compaq PCs. The key varies for other brands. It may be DEL, F2 or the F8 key in other systems. The POST screen will tell you which key should be pressed to get into the BIOS setup page. Or you can check the motherboard manual to get that info.
- Check the Boot Options or similar setting in the BIOS, and disable the option named Secure Boot. Here is a screenshot that shows how the Boot Options page might look like.
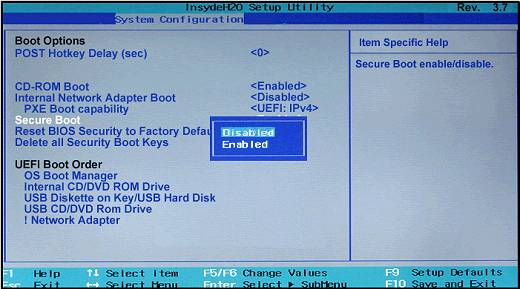
Secure Boot option in BIOS setup screen
Useful Links
- For HP and Compaq systems, check out this page that explains how to enable or disable secure boot.
- Neosmart has an excellent guide with exact instructions and screenshots showing BIOS of ASUS, ASRock, HP, and Acer computers or motherboards.
Hope this temporary workaround helps prevent the annoying “Your organization used Windows Defender Application Control to block this app” error on your Windows 8 or Windows 10 computer.
One small request: If you liked this post, please share this?
One "tiny" share from you would seriously help a lot with the growth of this blog. Some great suggestions:- Pin it!
- Share it to your favorite blog + Facebook, Reddit
- Tweet it!
Thanks for the help…It worked for me…!!!
This doesnt work for me, got an other solution?
btw i use: lenovo thinkpad x230.
For those who don’t see the option to disable secure boot, just clear all ur drives and reinstall Windows completely from bios. That’s how I got rid of this bs
Hi…I have had this problem but I did it..you just must follow this ..
Go to Windows defender firewall with advanced security..you can go there by control panel or use of Windows+R and writing Firewall.cpl…there you should find Windows defender firewall properties….on page of Domain profile look at the fire wall state section ..you see that block is preassume of Windows…you should change it to allow.just that.
I tried for a very long time to fix this issue. I have come up to many solutions that say this, so I have already tried it. It so far has not been working. Do I have to completely reinstall my Windows 10 Pro for it to allow the apps I need?
After 3 day of this message popping up. After trying to disable window defender. This is the only thing that help me thank you so much. I have a HP laptop, I turned it off and when I turn it back on I held f10.
Work for me, thanks
Thank you!!
Thank you Milad. You helped me.
I did this and it fixed my issue:
> Windows+R then type Firewall.cpl
> Advanced settings
> Windows Defender Firewall Properties
> Turn Firewall state back on (I had turned it off earlier)
> Change Inbound connections to “allow”, Apply
> Turn Firewall state to “Off”, Apply
Greetings. After spending hours of searching for help and modifying system settings and disabling Windows Defender in Windows 10 Enterprise (which didn’t work as a fix), in the Bios I basically just disabled the Windows UEFI Mode setting and selected Other OS (OS Type) under Secure Boot menu. My option to disable Secure Boot is automatically Enabled and greyed out so I cant disable it, but this method worked great. I have a new pc, just got it recently, its an i5 7400 with an Asustek motherboard H110M-D. I hope I helped out, God bless everyone.
(forgot to say thank you to the webpage publishers.) Thanks very much.
Thank you so so much worked for me i was really stuck with that popup all the time i couldnt install anything or open any .exe files .
i factory reset my pc using a usb of fresh windows 10 pro software. I have turned secure boot off. i cannot install many different exe files and always get the message “Your organization used windows defender application control to block this app”. This persists when i disable all windows defender through settings, gpedit and ‘using bsdedit /set nointegritychecks on’ and ‘bcdedit /set testsigning off’. Again, this is a brand new install using microsoft downloaded and created usb windows 10 media. I have tried before and after applying all updates. The only way i can is by doing advanced startup and changing ‘startup settings’ to ‘disable driver signature enforcement’. Then i can install whatever software i want. But this setting is temporary and is removed after reboot. I can install these exe files on other PCs i own without issue even ones connected to o365. The only difference with this PC was that it was previously enrolled in intune and defender for endpoint as a trial. I believe the issue may have started after this which is why i originally did a factory reset. But even after fresh windows install from USB I assume something in the TPI or UEFI settings was changed that is not effected by a fresh windows install because, like previously said, i have done a factory reset and logged in with a local account. This device has not connected to intune or the o365 domain and still the issue persists. I have tried every option out there and only doing the temporary ‘disable driver signature enforcement’ fixes the issue.
I actually found the answer!!!!! Which may be a help to a great number of people with all the unresolved issues that i see that have the exact same symptoms. I noticed in my wininfo32 that windows defender application control was set to ‘enforce’. i looked that up and found this article: Disable Windows Defender Application Control policies (Windows 10) – Windows security | Microsoft Docs. It lead me to believe that when i had endpoint for defender installed, that a p7b security policy was put in my EFI system partition which would make sense as to why factory resets didn’t resolve the problem. I rebooted into command prompt with local admin credentials and found a p7b file that was added earlier this month when i had installed defender for endpoint. To mount, locate and delete i performed the following:
mountvol P: /s
P:
cd Microsoft\Boot
dir *.p7b
del SiPolicy.p7b
exit
after reboot the problem was gone and msinfo32 no longer even showed the ‘windows defender application control policies’ and i was able to easily install exe and msi files. Problem solved!
@matthew: Excellent. Thanks for the tip.