If you want to extract audio from your video files such as MP4, MPG, MPEG, there are many free tools to do that. Extracting audio is from video files is what most people refer to as converting from MP4 to MP3. This article explains different methods (using freeware tools) to extract audio from your video files.
Extract audio from video files
How to Convert MP4 or Any Video to MP3
Option 1: Using Audacity
Audacity is an open-source, multi-track audio editor and recorder for Windows, Mac OS X, GNU/Linux, and other operating systems. Audacity can extract audio from video files into WAV, MP3, FLAC, OGG, MP2, WMA, M4A, and other formats using FFMpeg encoder.
- Download Audacity and FFmpeg for Audacity and install them.
- Launch Audacity and open the video file from which you want to output the audio.
Note: If you haven’t installed FFmpeg for Audacity, you’ll see the error Without the optional FFmpeg library, Audacity cannot open this type of file. Otherwise, you need to convert it to a supported audio format, such as WAV or AIFF when opening video files such as MP4 or MKV in Audacity.
- Once the input video file is opened, from the File menu, click Export and choose an output format. Export to MP3, WAV, and OGG options are preset choices. If you want to extract the audio to a different format other than MP3, WAV, or OGG, click Export Audio.
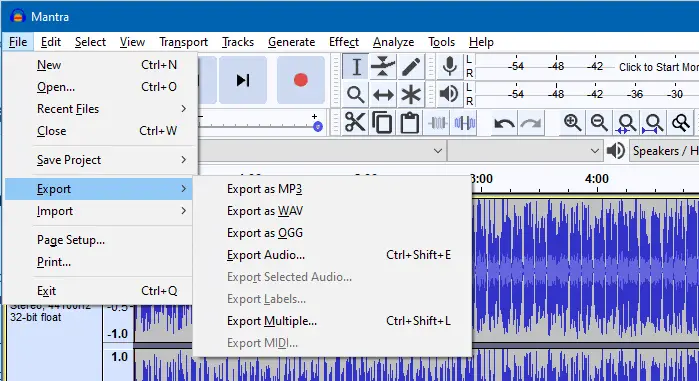
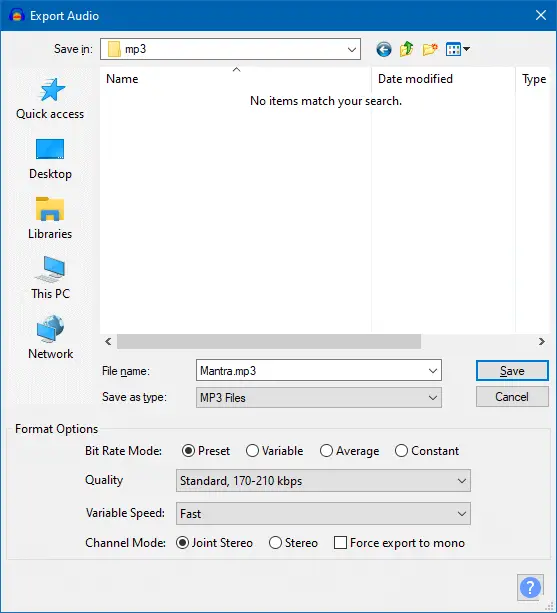
- In the Export Audio dialog, you can choose the quality/bitrate (constant bitrate or variable bitrate range), speed, channel mode, and the output file name.
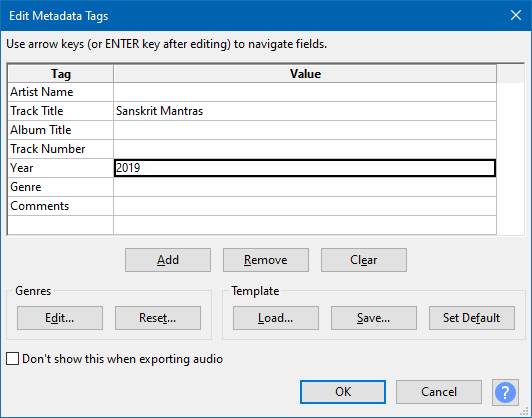
- In the next screen, you can add metadata tags to the output MP3 file if required. Note that the VLC Player (discussed in Option 2) doesn’t have this metadata option.
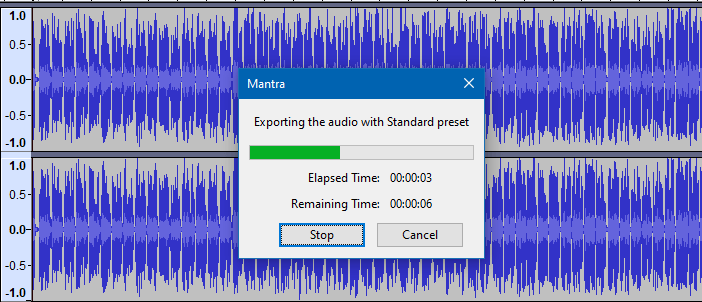
The output MP3 is now ready!

Note: If there are multiple audio tracks (e.g., one audio stream for each language in a movie file) in one media container (.mp4, .mkv, etc), you’re asked to select the audio stream to export, when launching Audacity.
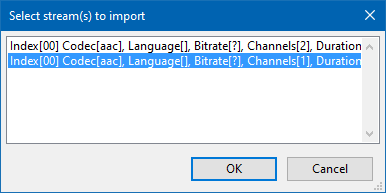
Select the audio track you want to import and click OK. Then follow the above instructions to export the audio stream to an MP3 file.
Export selected audio using Audacity
After you open the video, select the portion of the video/media by using the marker buttons above the waveform, or using the Start and End selection boxes at the bottom of the window.
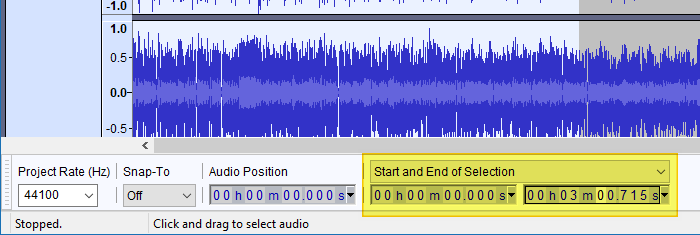
- Then, to export the selection, click on the File menu, click Export, and click Export Selected Audio…
- In the Save as dialog, type the output file name and click Save.
Option 2: Using Avidemux
Avidemux is a free and open-source video editing program designed for video editing and video processing. You can extract audio from video files and convert it into MP3 or other format using Avidemux.
Launch Avidemux and open the video file. In the Audio Output dropdown list box, choose MP3 (lame)
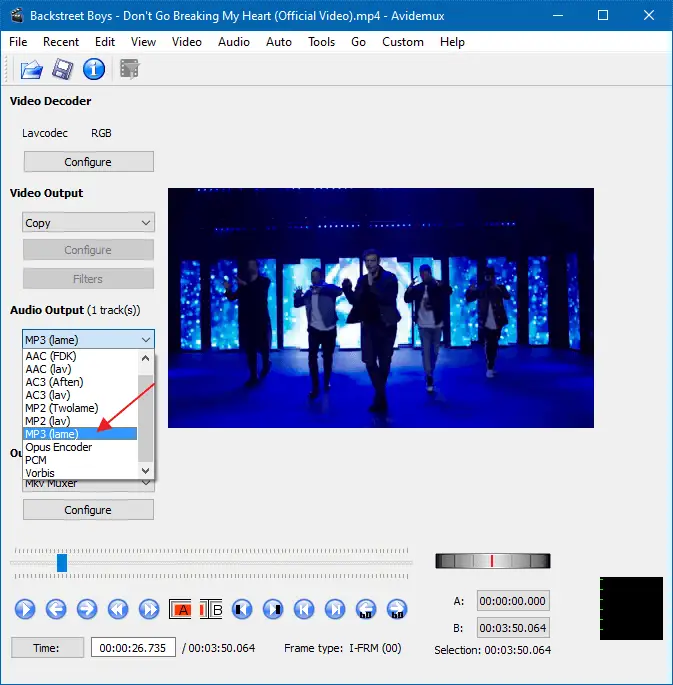
Click Configure to choose the bitrate and quality. There doesn’t seem to be a way to a variable bitrate in Avidemux.
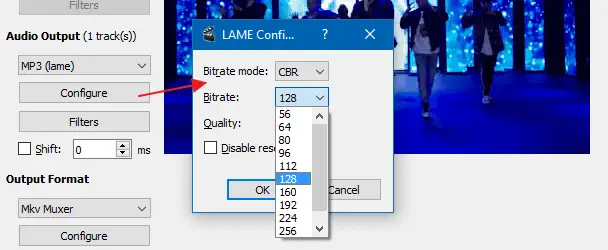
Once the output format is selected, click the Audio menu, and click Save Audio.

Assign a file name in the resulting file dialog box and save the .mp3 in the desired location.
Avidemux does support command-line/batch operations using avidemux.exe or avidemux_cli.exe. Check out using:command_line_usage [Avidemux]
Note: If there are multiple audio tracks (e.g., one audio stream for each language in a movie file) in one media container (.mp4, .mkv, etc), you can choose the appropriate audio track that you want to export. This can be done via the Audio menu, Select Track option in Avidemux.
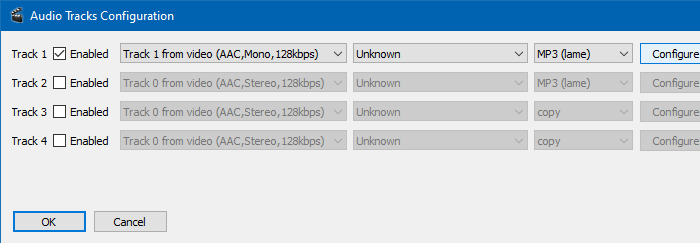
Export selected audio using Avidemux
Avidemux also has the Start marker and End marker buttons which are useful if you want to extract the audio from a specific portion of the video. For instance, you may want to extract the song portion or a dialog in a particular scene from a full movie.
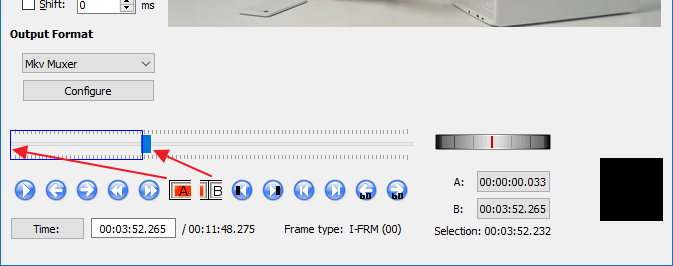
- Click on the starting point, and then click the marker button A.
- Click on the ending point, and then click the marker button B.
- Follow the rest of the instructions to export the audio. If the markers are active, only the selected portion is exported to MP3.
Note: To reset the markers, click Reset Markers from the Edit menu.
Option 3: Using VLC Player
VLC Player is a free and open-source multimedia player that plays most multimedia files as well as DVDs, Audio CDs, and various streaming protocols. It also supports converting videos into different formats — for Android, Youtube, etc., and extract audio from video files. It can extract audio to MP3, Flac, WMA, OGG, and other file formats.
To extract audio from video files, follow these steps:
Download VLC Player and run it. From the VLC Player’s Media menu, click the Convert / Save option.
In the Open Media dialog that opens, add the media files from which you want to extract the audio.
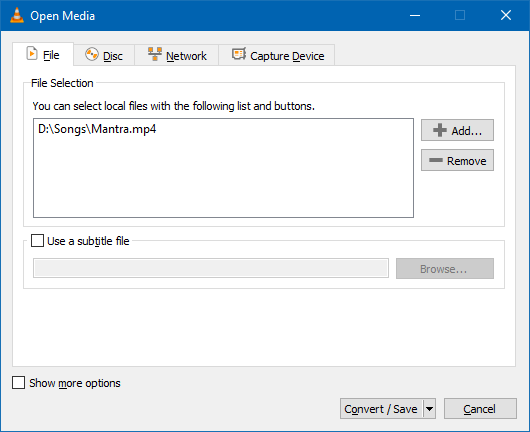
Click the Convert / Save button.
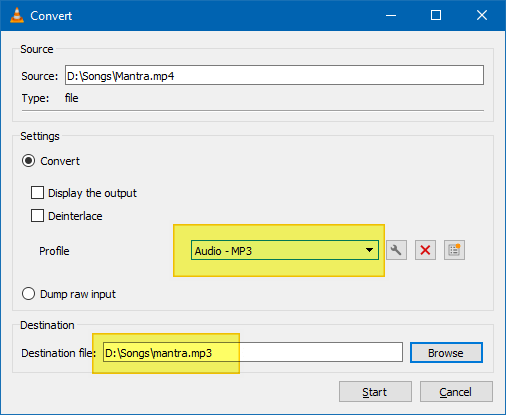
In the Convert dialog, select the output file format — e.g., Audio – MP3 option. You also have WMA, OGG, and other options in the list box.
You can click the settings button (identified by the wrench icon) and select the Audio codec tab to set the bitrate, sample rate, codec, etc. You can also select the required filters from the Filters tab. Make sure that the Keep original audio track is disabled when extracting audio from a video file.
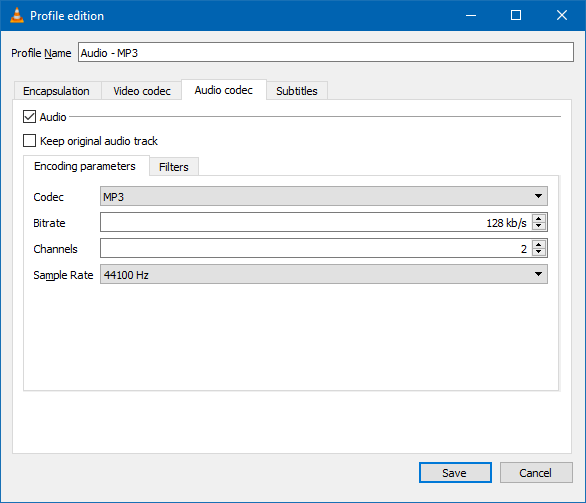
Click Save. Once you’re back to the Convert dialog, select the destination file name and click Start.
The MP3 file is now ready!
VLC command-line
To extract songs from a video file using VLC command-line, use this syntax:
vlc.exe -I dummy "d:\songs\mantra.mp4" --sout=#transcode{acodec=mp3,ab=192,vcodec=dummy}:std{access="file",mux="raw",dst="d:\songs\mantra.mp3"} vlc://quit
The above command-line converts MP4 to MP3 using 192 Kbps bitrate — saving the output as mantra.mp3 in the D:\Songs folder.
For more information on using the VLC Player in command-line mode, see Command-line – VideoLAN Wiki and Transcode – VideoLAN Wiki.
To batch encode MP4 to MP3, you can use the following command-line in a Windows Batch file and run it:
for %%a in (*.mp4) do "C:\Program Files (x86)\VideoLAN\VLC\vlc.exe" -I dummy "%%a" --sout=#transcode{acodec=mp3,ab=128,vcodec=dummy}:std{access="file",mux="raw",dst="%%a.mp3"} vlc://quit
The above command, when used in a batch file, extracts the audio from all the MP4 files in the current working directory to MP3 format. The output file will have the same name as the MP4, but with .mp3 extension.
You can also use the sample batch files from VLC Player documentation. See How To Transcode multiple videos to know how to batch convert videos via the Send To menu, PowerShell or command-line.
Export selected audio using VLC Player
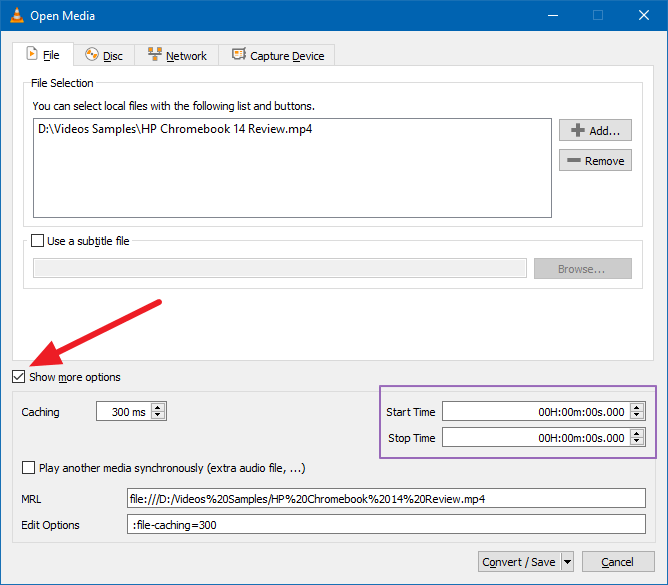
To export the selected portion of the media to MP3, in the convert options dialog, after adding your file(s) to the list, click on the Show more options button.
You’ll see the Start Time and Stop Time options among other additional settings. Select the starting and ending time, click Convert / Save and follow the rest of the instructions above to extract the audio from the media file to MP3.
Option 4: Using File Converter
If you use the excellent File Converter program, it adds a context menu which lets you convert files from one format to another. As you can see in the following screenshot, you can configure the presets in the settings page. You can set the output file format (MP3), bitrate (variable or constant), filename template, etc.
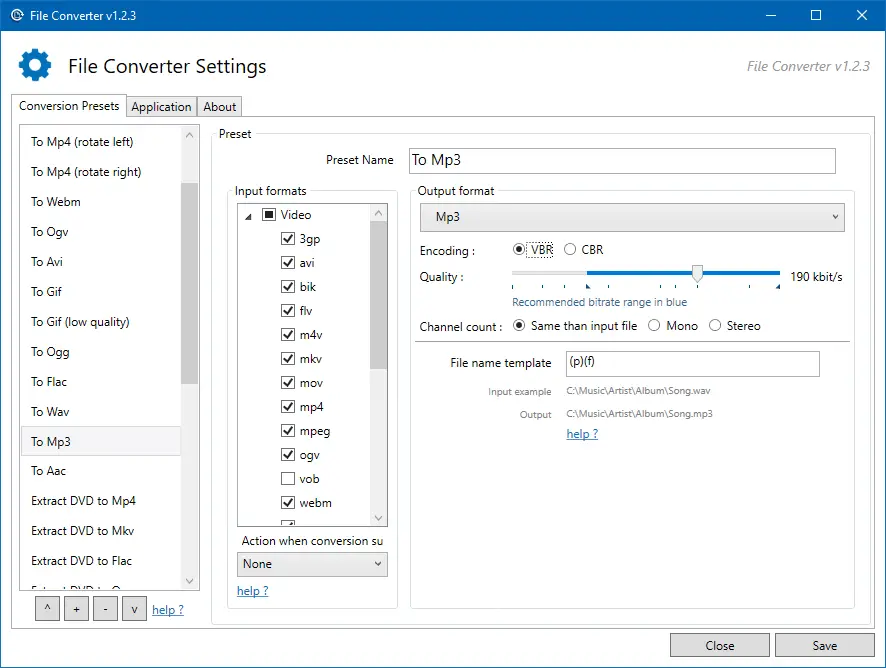
File Converter a brilliant piece of software that uses different frameworks (as middleware). Here is the list of middleware software used by the File Converter program.
- FFmpeg for media processing
- ImageMagick for image processing
- Ghostscript for PDF output
- SharpShell for context menu handler
- Ripper and yeti.mmedia for CD Audio extraction
- Markdown.XAML for markdown rendering in the WPF application
- WpfAnimatedGif for animated gif rendering in the WPF application
Here are the input and output format combinations supported by this tool.
| Supported output formats | Compatible input formats | |
|---|---|---|
| Audio | flac, aac, ogg, mp3, wav | 3gp, aiff, ape, avi, bik, cda, flac, flv, m4a, mkv, mov, mp3, mp4, oga, ogg, wav, webm, wma, wmv |
| Video | webm, mkv, mp4, ogv, avi, gif | 3gp, avi, bik, flv, gif, m4v, mkv, mp4, mpeg, mov, ogv, webm, wmv |
| Image | png, jpg, ico, webp | bmp, exr, ico, jpg, jpeg, png, psd, svg, tiff, tga, webp, pdf, doc*, docx*, odt*, odp*, ods*, ppt*, pptx*, xls*, xlsx* |
| Document | doc*, docx*, odt*, odp*, ods*, ppt*, pptx*, xls*, xlsx*, bmp, exr, ico, jpg, jpeg, png, psd, svg, tiff, tga |
Option 5: Using FFMpeg.exe
FFmpeg is a free and open-source project consisting of a software suite of libraries and programs for handling video, audio, and other multimedia files and streams. You can do pretty much any media conversion/encoding task using this console tool. There are many third-party programs such as Screen to Gif, File Converter, etc. that are bundled with FFmpeg.exe. [Download FFmpeg]
Here is the command-line syntax to convert an MP4 file to MP3 (constant bitrate) using FFMpeg.exe — i.e., technically, extracting audio from a video file such as MP4, MKV, AVI, MPEG, etc.
ffmpeg -i "D:\Songs\Mantra.mp4" -codec:a libmp3lame -ab 128000 "D:\Songs\Mantra.mp3"
(or)
ffmpeg.exe -i "D:\Songs\Mantra.mp4" -f mp3 -ab 192000 -vn "D:\Songs\Mantra.mp3"
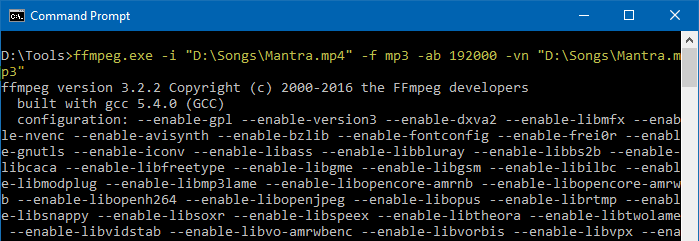
Parameters:
-i: Input file name/path-f: output file format-ab: Bitrate of the output file. Value of192000means192 Kbpsbit rate.-vn: disable video
followed by the output MP3 file path.
If you need variable bitrate (VBR) MP3 audio, you need to use the -qscale:a(alias: -q:a) parameter instead of -b:a (or -ab) option.
Example: To encode VBR MP3 audio with FFmpeg using the libmp3lame library, use the following command-line syntax:
ffmpeg -i "D:\Songs\Mantra.mp4" -codec:a libmp3lame -qscale:a 2 "D:\Songs\Mantra.mp3"
Here is the list of possible -qscale values and the corresponding VBR range. (Source: Encode/MP3 – FFmpeg)
| LAME Bitrate Overview | |||
|---|---|---|---|
| lame option | Average kbit/s | Bitrate range kbit/s | FFmpeg option |
| -b 320 | 320 | 320 CBR (non-VBR) example | -b:a 320k (NB this is 32KB/s, or its max) |
| -V 0 | 245 | 220-260 | -q:a 0 (NB this is VBR from 22 to 26 KB/s) |
| -V 1 | 225 | 190-250 | -q:a 1 |
| -V 2 | 190 | 170-210 | -q:a 2 |
| -V 3 | 175 | 150-195 | -q:a 3 |
| -V 4 | 165 | 140-185 | -q:a 4 |
| -V 5 | 130 | 120-150 | -q:a 5 |
| -V 6 | 115 | 100-130 | -q:a 6 |
| -V 7 | 100 | 80-120 | -q:a 7 |
| -V 8 | 85 | 70-105 | -q:a 8 |
| -V 9 | 65 | 45-85 | -q:a 9 |
Extract Multiple audio tracks
To extract a particular audio track from a video file containing multiple audio tracks, follow these steps:
First, view the list of streams/tracks from a sample file named test5.mkv using the following command:
ffmpeg -i test5.mkv
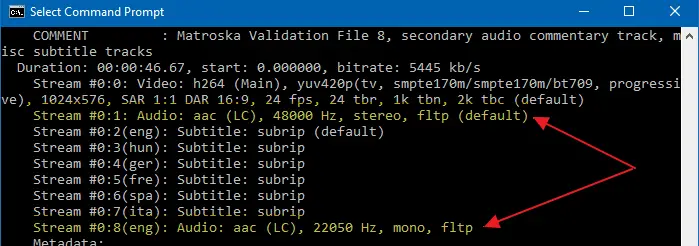
In the output, you can see that the Streams #0:1 and #0:8 are audio tracks and the rest are subtitles (for various languages) in the MKV container.
To extract the two audio streams to two separate MP3 files, use the following command-line syntax:
ffmpeg.exe -i "test5.mkv" -f mp3 -map 0:1 -ab 192000 -vn "lang-1.mp3"
ffmpeg.exe -i "test5.mkv" -f mp3 -map 0:8 -ab 192000 -vn "lang-2.mp3"
For more information about the -map command-line argument, see Map – FFmpeg documentation.
Batch convert videos to MP3
To batch convert videos to MP3 in a folder, use the for command-line as below:
FOR /F "tokens=*" %G IN ('dir /b *.mp4') DO ffmpeg -i "%G" -f mp3 -ab 128000 "%~nG.mp3"
The above command-line converts all the MP4 files in the current working directory to MP3 with 128Kbps bitrate. The output files will have the same name but contain the .mp3 extension.
Export selected audio using FFmpeg.exe
To export selected part of the media file to MP3, use the -ss and -to switches in addition. Here are some examples:
Extract first 1 minute of audio to MP3
(CBR)
ffmpeg -ss 00:00:00 -i "D:\Songs\Mantra.mp4" -codec:a libmp3lame -ab 128000 -to 00:01:00 "D:\Songs\Mantra.mp3"
(VBR)
ffmpeg -ss 00:00:00 -i "D:\Songs\Mantra.mp4" -codec:a libmp3lame -qscale:a 2 -to 00:01:00 "D:\Songs\Mantra.mp3"
-ss: Starting point-i: Specifies the input audio/video file.-to: Ending point.

- Instead of specifying the exact time for the Ending point, you can also use
-t, which specifies the duration. For example, the options-ss 00:00:40 -t 00:00:10will capture from second 40 to 50 — total 10 seconds. If you use both-toand-t,-twill be used.
When batch converting videos to MP3, you may sometimes want to trim a few seconds only at the beginning of each file. In that case, you can mention the --ss value without having to mention the -to parameter if each media file has a different duration.
- If the
-ssis specified and-to(ending point) is not specified, FFmpeg.exe takes the media’s duration as the ending point. - If the
-tois specified and-ss(starting point) is not specified, FFmpeg.exe assumes the starting point as 00:00:00.
Extract audio starting from 00:00:30 (seconds) to 00:02:00 (minutes)
(at CBR @128 Kbps)
ffmpeg -ss 00:00:30 -i "D:\Songs\Mantra.mp4" -codec:a libmp3lame -ab 128000 -to 00:02:00 "D:\Songs\Mantra.mp3"
(or at VBR)
ffmpeg -ss 00:00:30 -i "D:\Songs\Mantra.mp4" -codec:a libmp3lame -qscale:a 2 -to 00:02:00 "D:\Songs\Mantra.mp3"
The above command extracts audio starting from the 30th second of the video and ends at 2 minutes — i.e., the total selection length is 1 minute 30 seconds.
Option 6: Using Switch Audio Converter from NCH
Switch Audio Converter is a universal audio converter that supports all popular formats. This software is available as a 14-day fully-functional trial. It can convert or compress sound files, batch convert audio from one format to the other in bulk. It can also extract audio from any media file including video.
You can download Switch Audio Converter by NCH Software from the Microsoft Store and install it.
Add the input video/audio files to the list by click on the Add File(s) chevron. You can input almost any (popular) type of video or audio file and convert it to the required audio format.
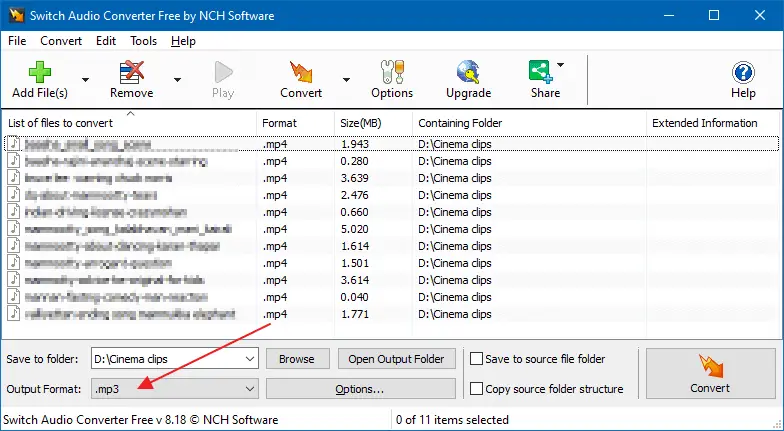
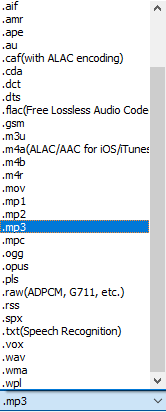
Select the output format (.mp3). The following are the formats you can choose from. Most of the audio formats (including .ogg, .wma, .flac, .wav) are available in the drop-down.
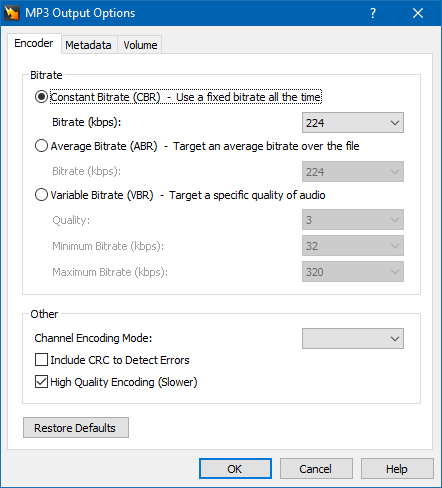
Once .mp3 is selected from the list box, optionally, you can set the output bitrate. The lower the bitrate, the lower is the audio quality and also the file size.
Switch Audio by NCH software has the simplest interface and it’s probably the best choice for bulk converting videos to mp3 (or any other audio format). If your job involves video to audio bulk conversions/extractions, NCH software could be your best investment. The commercial license costs just 35 USD.
The free version of Switch also has the additional features of Switch Plus enabled for a 14-day free trial after the software is first installed. If you choose not to purchase the Switch Plus license upgrade at the end of the free trial period, the advanced features will be disabled but the standard Switch features will continue to work.
Out of the above methods, the File Converter and the FFMpeg.exe console methods are especially helpful if you need to batch convert videos to MP3 (for free). For extracting a particular audio track from a multi-track video file, you have these options: FFMpeg, Avidemux, or Audacity.
One small request: If you liked this post, please share this?
One "tiny" share from you would seriously help a lot with the growth of this blog. Some great suggestions:- Pin it!
- Share it to your favorite blog + Facebook, Reddit
- Tweet it!